Category Archives: Canonical voices

Inexpensive highly available LXD cluster: 6 months later

Over the past few posts, I covered the hardware I picked up to setup a small LXD cluster and get it all setup at a co-location site near home. I’ve then gone silent for about 6 months, not because anything went wrong but just because of not quite finding the time to come back and complete this story!

So let’s pick things up where I left them with the last post and cover the last few bits of the network setup and then go over what happened over the past 6 months.

Routing in a HA environment

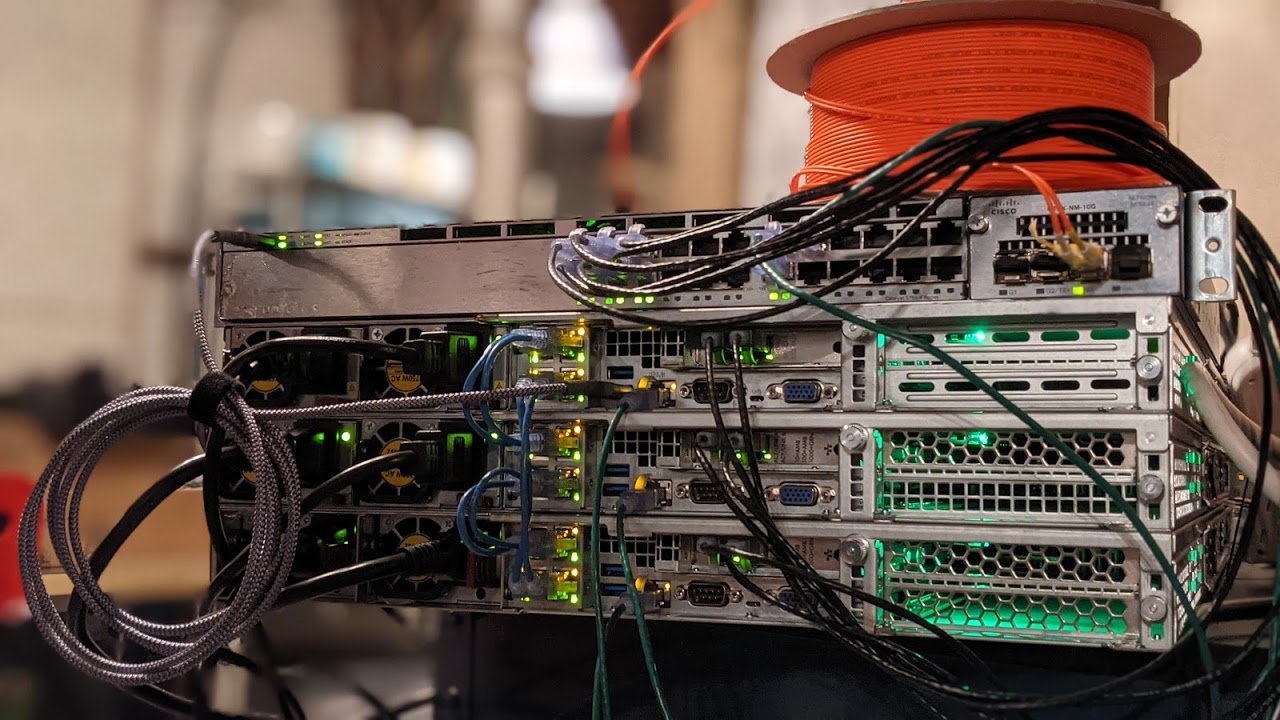
You may recall that the 3 servers are both connected to a top of the rack switch (bonded dual-gigabit) as well as connected to each other (bonded dual-10-gigabit). The netplan config in the previous post would allow each of the servers to talk to the others directly and establish a few VLANs on the link to the top of the rack switch.

Those are for:

  • WAN-HIVE: Peering VLAN with my provider containing their core routers and mine
  • INFRA-UPLINK: OVN uplink network (where all the OVN virtual routers get their external addresses)
  • INFRA-HOSTS: VLAN used for external communication with the servers
  • INFRA-BMC: VLAN used for the management ports of the servers (BMCs) and switch, isolated from the internet

Simply put, the servers have their main global address and default gateway on INFRA-HOSTS, the BMCs and switch have their management addresses in INFRA-BMC, INFRA-UPLINK is consumed by OVN and WAN-HIVE is how I access the internet.

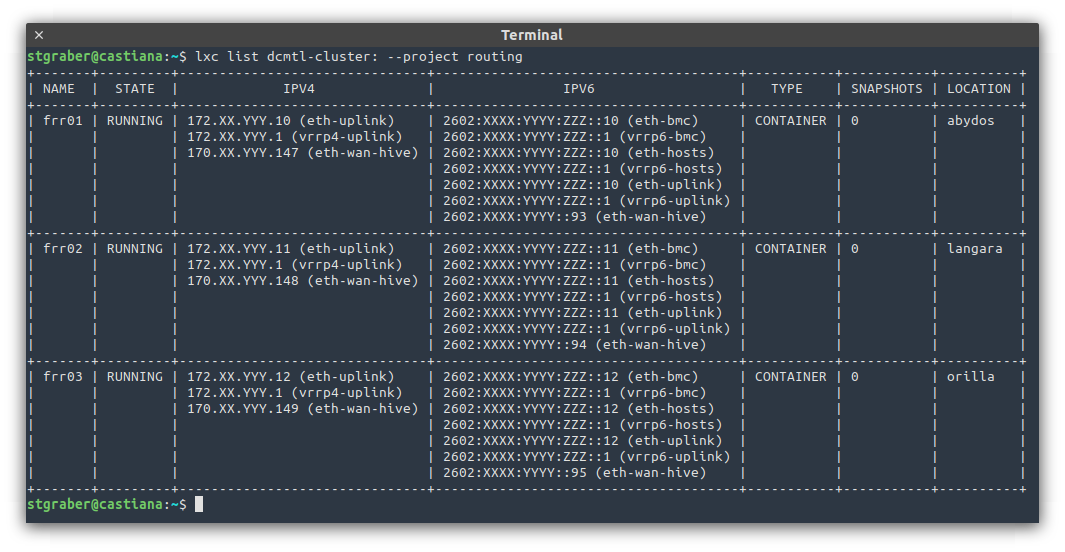
In my setup, I then run three containers, one on each server which each gets direct access to all those VLANs and act as a router using FRR. FRR is configured to establish BGP sessions with both of my provider’s core routers, getting routing to the internet that way and announcing my IPv4 and IPv6 subnets that way too.

LXD output showing the 3 FRR routers

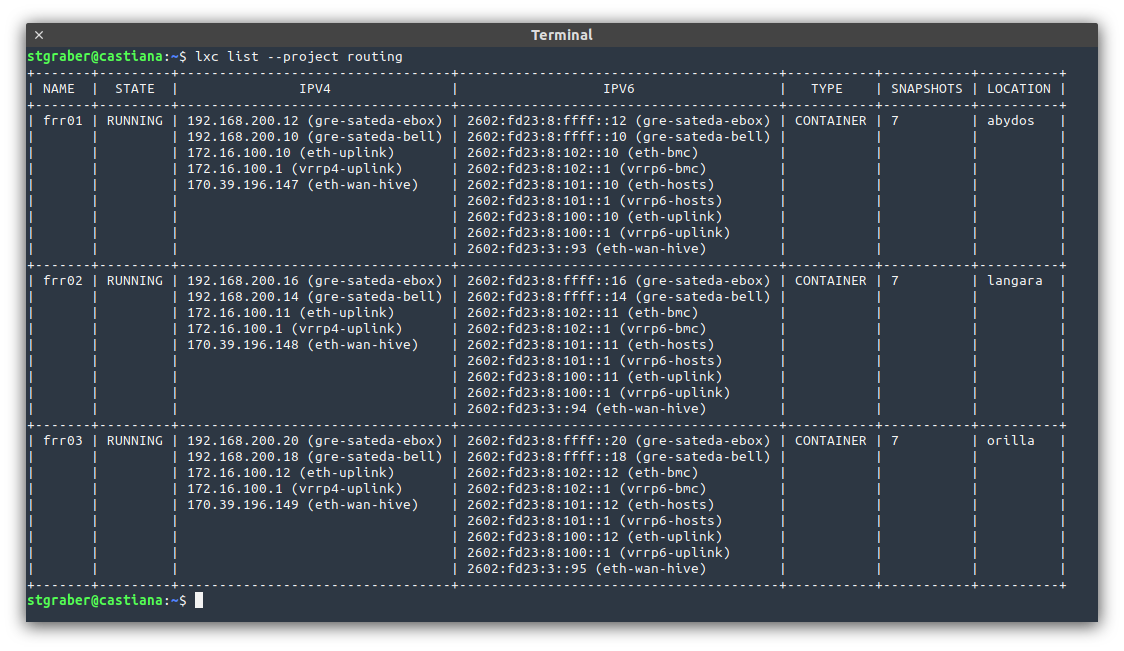
On the internal side of things, I’m using VRRP to provide a virtual router internally. Typically this means that frr01 is the default gateway for all egress traffic while ingress traffic is somewhat spread across all 3 thanks to them having the same BGP weight (so my provider’s routers distribute the connections across all active peers).

With that in place, so long as one of the FRR instances are running, connectivity is maintained. This makes doing maintenance quite easy as there is effectively no SPOF.

Enter LXD networks with OVN

Now for where things get a bit trickier. As I’m using OVN to provide virtual networks inside of LXD, each of those networks will typically need some amount of public addressing. For IPv6, I don’t do NAT so each of my networks get a public /64 subnet. For IPv4, I have a limited number of those, so I just assign them one by one (/32) directly to specific instances.

Whenever such a network is created, it will grab an IPv4 and IPv6 address from the subnet configured on INFRA-UPLINK. That part is all good and the OVN gateway becomes immediately reachable.

The issue is with the public IPv6 subnet used by each network and with any additional addresses (IPv4 or IPv6) which are routed directly to its instances. For that to work, I need my routers to send the traffic headed for those subnets to the correct OVN gateway.

But how do you do that? Well, there are pretty much three options here:

  • You use LXD’s default mode of performing NDP proxying. Effectively, LXD will configure OVN to directly respond to ARP/NDP on the INFRA-UPLINK VLAN as if the gateway itself was holding the address being reached.
    This is a nice trick which works well at pretty small scale. But it relies on LXD configuring a static entry for every single address in the subnet. So that’s fine for a few addresses but not so much when you’re talking a /64 IPv6 subnet.
  • You add static routing rules to your routers. Basically you run lxc network show some-name and look for the IPv4 and IPv6 addresses that the network got assigned, then you go on your routers and you configure static routes for all the addresses that need to be sent to that OVN gateway. It works, but it’s pretty manual and effectively prevents you from delegating network creation to anyone who’s not the network admin too.
  • You use dynamic routing to have all public subnets and addresses configured on LXD to be advertised to the routers with the correct next-hop address. With this, there is no need to configure anything manually, keeping the OVN config very simple and allowing any user of the cluster to create their own networks and get connectivity.

Naturally I went with the last one. At the time, there was no way to do that through LXD, so I made my own by writing lxd-bgp. This is a pretty simple piece of software which uses the LXD API to inspect its networks, determine all OVN networks tied to a particular uplink network (INFRA-UPLINK in my case) and then inspect all instances running on that network.

It then sends announcements both for the subnets backing each OVN networks as well as for specific routes/addresses that are routed on top of that to specific instances running on the local system.

The result is that when an instance with a static IPv4 and IPv6 starts, the lxd-bgp instance running on that particular system will send an announcement for those addresses and traffic will start flowing.

Now deploy the same service on 3 servers, put them into 3 different LXD networks and set the exact same static IPv4 and IPv6 addresses on them and you now have a working anycast service. When one of the containers or its host go down for some reason, that route announcement goes away and the traffic now heads to the remaining instances. That does a good job at some simplistic load-balancing and provides pretty solid service availability!

LXD output of my 3 DNS servers (backing ns1.stgraber.org) and using anycast

The past 6 months

Now that we’ve covered the network setup I’m running, let’s spend a bit of time going over what happened over the past 6 months!

The servers and switch installed in the cabinet

In short, well, not a whole lot. Things have pretty much just been working. The servers were installed in the datacenter on the 21st of December. I’ve then been busy migrating services from my old server at OVH over to the new cluster, finalizing that migration at the end of April.

I’ve gotten into the habit of doing a full reboot of the entire cluster every week and developed a bit of tooling for this called lxd-evacuate. This makes it easy to relocate any instance which isn’t already highly available, emptying a specific machine and then letting me reboot it. By and large this has been working great and it’s always nice to have confidence that should something happen, you know all the machines will boot up properly!

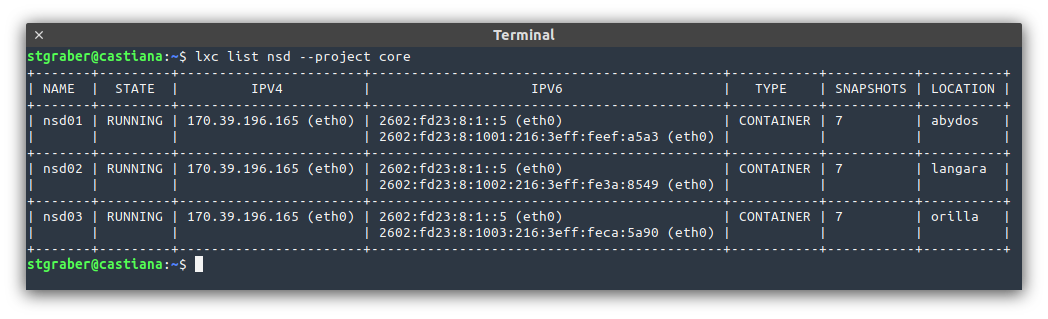
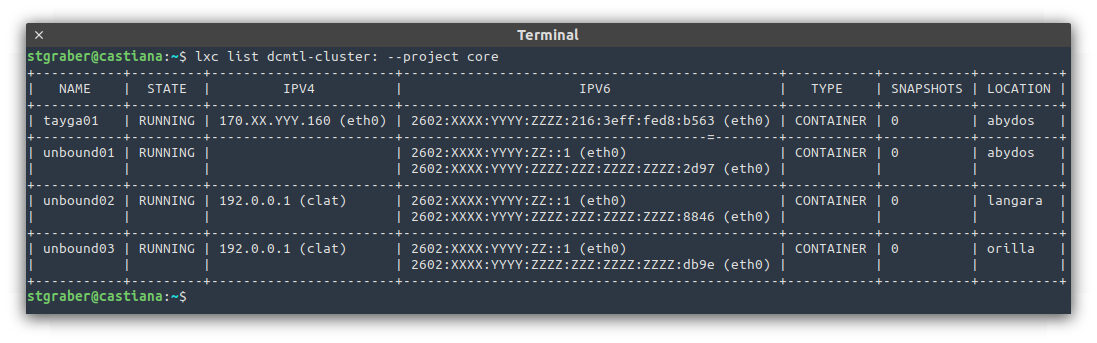
These days, I’m running 63 instances across 9 projects and a dozen networks. I spent a bit of time building up a Grafana dashboard which tracks and alerts on my network consumption (WAN port, uplink to servers and mesh), monitors the health of my servers (fan speeds, temperature, …), tracks CEPH consumption and performance, monitors the CPU, RAM and load of each of the servers and also track performance on my top services (NSD, unbound and HAProxy).

LXD also rolled out support for network ACLs somewhat recently, allowing for proper stateful firewalling directly through LXD and implemented in OVN. It took some time to setup all those ACLs for all instances and networks but that’s now all done and makes me feel a whole lot better about service security!

What’s next

On the LXD front, I’m excited about a few things we’re doing over the next few months which will make environments like mine just that much nicer:

  • Native BGP support (no more lxd-bgp)
  • Native cluster server evacuation (no more lxd-evacuate)
  • Built-in DNS server for instance forward/reverse records as well as DNS zones tied to networks
  • Built-in metrics (prometheus) endpoint exposing CPU/memory/disk/network usage of all local instances

This will let me deprecate some of those side projects I had to start as part of this work, will reduce the amount of manual labor involved in setting up all the DNS records and will give me much better insight on what’s consuming resources on the cluster.

I’m also in the process of securing my own ASN and address space through ARIN, mostly because that seemed like a fun thing to do and will give me a tiny bit more flexibility too (not to mention let me consolidate a whole bunch of subnets). So soon enough, I expect to have to deal with quite a bit of re-addressing, but I’m sure it will be a fun and interesting experience!

Posted in Canonical voices, LXD, Planet Ubuntu | Tagged | 6 Comments

Inexpensive highly available LXD cluster: Server setup

The previous post went over the planned redundancy aspect of this setup at the storage, networking and control plane level. Now let’s see how to get those systems installed and configured for this setup.

Firmware updates and configuration

First thing first, whether its systems coming from an eBay seller or straight from the factory, the first step is always to update all firmware to the latest available.

In my case, that meant updating the SuperMicro BMC firmware and then the BIOS/UEFI firmware too. Once done, perform a factory reset of both the BMC and UEFI config and then go through the configuration to get something that suits your needs.

The main things I had to tweak other than the usual network settings and accounts were:

  • Switch the firmware to UEFI only and enable Secure Boot
    This involves flipping all option ROMs to EFI, disabling CSM and enabling Secure Boot using the default keys.
  • Enable SR-IOV/IOMMU support
    Useful if you ever want to use SR-IOV or PCI device passthrough.
  • Disable unused devices
    In my case, the only storage backplane is connected to a SAS controller with nothing plugged into the SATA controller, so I disabled it.
  • Tweak storage drive classification
    The firmware allows configuring if a drive is HDD or SSD, presumably to control spin up on boot.

Base OS install

With that done, I grabbed the Ubuntu 20.04.1 LTS server ISO, dumped it onto a USB stick and booted the servers from it.

I had all servers and their BMCs connected to my existing lab network to make things easy for the initial setup, it’s easier to do complex network configuration after the initial installation.

The main thing to get right at this step is the basic partitioning for your OS drive. My original plan was to carve off some space from the NVME drive for the OS, unfortunately after an initial installation done that way, I realized that my motherboard doesn’t support NVME booting so ended up reinstalling, this time carving out some space from the SATA SSD instead.

In my case, I ended up creating a 35GB root partition (ext4) and 4GB swap partition, leaving the rest of the 2TB drive unpartitioned for later use by Ceph.

With the install done, make sure you can SSH into the system, also check that you can access the console through the BMC both through VGA and through the IPMI text console. That last part can be done by dumping a file in /etc/default/grub.d/ that looks like:

GRUB_CMDLINE_LINUX="${GRUB_CMDLINE_LINUX} console=tty0 console=ttyS1,115200n8"

Finally you’ll want to make sure you apply any pending updates and reboot, then check dmesg for anything suspicious coming from the kernel. Better catch compatibility and hardware issues early on.

Networking setup

On the networking front you may remember I’ve gotten configs with 6 NICs, two gigabit ports and four 10gbit ports. The gigabit NICs are bonded together and go to the switch, the 10gbit ports are used to create a mesh with each server using a two ports bond to the others.

Combined with the dedicated BMC ports, this ends up looking like this:

Here we can see the switch receiving its uplink over LC fiber, each server has its BMC plugged into a separate switch port and VLAN (green cables), each server is also connected to the switch with a two port bond (black cables) and each server is connected to the other two using a two port bond (blue cables).

Ubuntu uses Netplan for its network configuration these days, the configuration on those servers looks something like this:

network:
  version: 2
  ethernets:
    enp3s0f0:
      accept-ra: false
      dhcp4: false
      dhcp6: false
      mtu: 9000
    enp3s0f1:
      accept-ra: false
      dhcp4: false
      dhcp6: false
      mtu: 9000
    enp1s0f0:
      accept-ra: false
      dhcp4: false
      dhcp6: false
      mtu: 9000
    enp1s0f1:
      accept-ra: false
      dhcp4: false
      dhcp6: false
      mtu: 9000
    ens1f0:
      accept-ra: false
      dhcp4: false
      dhcp6: false
      mtu: 9000
    ens1f1:
      accept-ra: false
      dhcp4: false
      dhcp6: false
      mtu: 9000

  bonds:
    # Connection to first other server
    bond-mesh01:
      interfaces:
        - enp3s0f0
        - enp3s0f1
      accept-ra: false
      dhcp4: false
      dhcp6: false
      mtu: 9000
      parameters:
        mode: 802.3ad
        lacp-rate: fast
        mii-monitor-interval: 100
        transmit-hash-policy: layer3+4

    # Connection to second other server
    bond-mesh02:
      interfaces:
        - enp1s0f0
        - enp1s0f1
      accept-ra: false
      dhcp4: false
      dhcp6: false
      mtu: 9000
      parameters:
        mode: 802.3ad
        lacp-rate: fast
        mii-monitor-interval: 100
        transmit-hash-policy: layer3+4

    # Connection to the switch
    bond-sw01:
      interfaces:
        - ens1f0
        - ens1f1
      link-local: []
      accept-ra: false
      dhcp4: false
      dhcp6: false
      mtu: 1500
      parameters:
        mode: 802.3ad
        lacp-rate: fast
        mii-monitor-interval: 100
        transmit-hash-policy: layer3+4

  vlans:
    # WAN-HIVE
    bond-sw01.50:
      link: bond-sw01
      id: 50
      link-local: []
      accept-ra: false
      dhcp4: false
      dhcp6: false
      mtu: 1500

    # INFRA-UPLINK
    bond-sw01.100:
      link: bond-sw01
      id: 100
      link-local: []
      accept-ra: false
      dhcp4: false
      dhcp6: false
      mtu: 1500

    # INFRA-HOSTS
    bond-sw01.101:
      link: bond-sw01
      id: 101
      link-local: []
      accept-ra: false
      dhcp4: false
      dhcp6: false
      mtu: 1500

    # INFRA-BMC
    bond-sw01.102:
      link: bond-sw01
      id: 102
      link-local: []
      accept-ra: false
      dhcp4: false
      dhcp6: false
      mtu: 1500

  bridges:
    # WAN-HIVE
    br-wan-hive:
      interfaces:
        - bond-sw01.50
      link-local: []
      accept-ra: false
      dhcp4: false
      dhcp6: false
      mtu: 1500

    # INFRA-UPLINK
    br-uplink:
      interfaces:
        - bond-sw01.100
      link-local: []
      accept-ra: false
      dhcp4: false
      dhcp6: false
      mtu: 1500

    # INFRA-HOSTS
    br-hosts:
      interfaces:
        - bond-sw01.101
      accept-ra: true
      dhcp4: false
      dhcp6: false
      mtu: 1500
      nameservers:
        search:
          - stgraber.net
        addresses:
          - 2602:XXXX:Y:10::1

    # INFRA-BMC
    br-bmc:
      interfaces:
        - bond-sw01.102
      link-local: []
      accept-ra: false
      dhcp4: false
      dhcp6: false
      mtu: 1500

That’s the part which is common to all servers, then on top of that, each server needs its own tiny bit of config to setup the right routes to its other two peers, this looks like this:

network:
  version: 2
  bonds:
    # server 2
    bond-mesh01:
      addresses:
        - 2602:XXXX:Y:ZZZ::101/64
      routes:
        - to: 2602:XXXX:Y:ZZZ::100/128
          via: fe80::ec7c:7eff:fe69:55fa

    # server 3
    bond-mesh02:
      addresses:
        - 2602:XXXX:Y:ZZZ::101/64
      routes:
        - to: 2602:XXXX:Y:ZZZ::102/128
          via: fe80::8cd6:b3ff:fe53:7cc

  bridges:
    br-hosts:
      addresses:
        - 2602:XXXX:Y:ZZZ::101/64

My setup is pretty much entirely IPv6 except for a tiny bit of IPv4 for some specific services so that’s why everything above very much relies on IPv6 addressing, but the same could certainly be done using IPv4 instead.

With this setup, I have a 2Gbit/s bond to the top of the rack switch configured to use static addressing but using the gateway provided through IPv6 router advertisements. I then have a first 20Gbit/s bond to the second server with a static route for its IP and then another identical bond to the third server.

This allows all three servers to communicate at 20Gbit/s and then at 2Gbit/s to the outside world. The fast links will almost exclusively be carrying Ceph, OVN and LXD internal traffic, the kind of traffic that’s using a lot of bandwidth and requires good latency.

To complete the network setup, OVN is installed using the ovn-central and ovn-host packages from Ubuntu and then configured to communicate using the internal mesh subnet.

This part is done by editing /etc/default/ovn-central on all 3 systems and updating OVN_CTL_OPTS to pass a number of additional parameters:

  • --db-nb-addr to the local address
  • --db-sb-addr to the local address
  • --db-nb-cluster-local-addr to the local address
  • --db-sb-cluster-local-addr to the local address
  • --db-nb-cluster-remote-addr to the first server’s address
  • --db-sb-cluster-remote-addr to the first server’s address
  • --ovn-northd-nb-db to all the addresses (port 6641)
  • --ovn-northd-sb-db to all the addresses (port 6642)

The first server shouldn’t have the remote-addr ones set as it’s the bootstrap server, the others will then join that initial server and join the cluster at which point that startup argument isn’t needed anymore (but it doesn’t really hurt to keep it in the config).

If OVN was running unclustered, you’ll want to reset it by wiping /var/lib/ovn and restarting ovn-central.service.

Storage setup

On the storage side, I won’t go over how to get a three nodes Ceph cluster, there are many different ways to achieve that using just about every deployment/configuration management tool in existence as well as upstream’s own ceph-deploy tool.

In short, the first step is to deploy a Ceph monitor (ceph-mon) per server, followed by a Ceph manager (ceph-mgr) and a Ceph metadata server (ceph-mds). With that done, one Ceph OSD (ceph-osd) per drive needs to be setup. In my case, both the HDDs and the NVME SSD are consumed in full for this while for the SATA SSD I created a partition using the remaining space from the installation and put that into Ceph.

At that stage, you may want to learn about Ceph crush maps and do any tweaking that you want based on your storage setup.

In my case, I have two custom crush rules, one which targets exclusively HDDs and one which targets exclusively SSDs. I’ve also made sure that each drive has the proper device class and I’ve tweaked the affinity a bit such that the faster drives will be prioritized for the first replica.

I’ve also created an initial ceph fs filesystem for use by LXD with:

ceph osd pool create lxd-cephfs_metadata 32 32 replicated replicated_rule_ssd
ceph osd pool create lxd-cephfs_data 32 32 replicated replicated_rule_hdd
ceph fs new lxd-cephfs lxd-cephfs_metadata lxd-cephfs_data
ceph fs set lxd-cephfs allow_new_snaps true

This makes use of those custom rules, putting the metadata on SSD with the actual data on HDD.

The cluster should then look something a bit like that:

root@langara:~# ceph status
  cluster:
    id:     dd7a8436-46ff-4017-9fcb-9ef176409fc5
    health: HEALTH_OK
 
  services:
    mon: 3 daemons, quorum abydos,langara,orilla (age 37m)
    mgr: langara(active, since 41m), standbys: abydos, orilla
    mds: lxd-cephfs:1 {0=abydos=up:active} 2 up:standby
    osd: 12 osds: 12 up (since 37m), 12 in (since 93m)
 
  task status:
    scrub status:
        mds.abydos: idle
 
  data:
    pools:   5 pools, 129 pgs
    objects: 16.20k objects, 53 GiB
    usage:   159 GiB used, 34 TiB / 34 TiB avail
    pgs:     129 active+clean

With the OSDs configured like so:

root@langara:~# ceph osd tree
ID  CLASS  WEIGHT    TYPE NAME         STATUS  REWEIGHT  PRI-AFF
-1         34.02979  root default                               
-3         11.34326      host abydos                            
 4    hdd   3.63869          osd.4         up   1.00000  0.12500
 7    hdd   5.45799          osd.7         up   1.00000  0.25000
 0    ssd   0.46579          osd.0         up   1.00000  1.00000
10    ssd   1.78079          osd.10        up   1.00000  0.75000
-5         11.34326      host langara                           
 5    hdd   3.63869          osd.5         up   1.00000  0.12500
 8    hdd   5.45799          osd.8         up   1.00000  0.25000
 1    ssd   0.46579          osd.1         up   1.00000  1.00000
11    ssd   1.78079          osd.11        up   1.00000  0.75000
-7         11.34326      host orilla                            
 3    hdd   3.63869          osd.3         up   1.00000  0.12500
 6    hdd   5.45799          osd.6         up   1.00000  0.25000
 2    ssd   0.46579          osd.2         up   1.00000  1.00000
 9    ssd   1.78079          osd.9         up   1.00000  0.75000

LXD setup

The last piece is building up a LXD cluster which will then be configured to consume both the OVN networking and Ceph storage.

For OVN support, using an LTS branch of LXD won’t work as 4.0 LTS predates OVN support, so instead I’ll be using the latest stable release.

Installation is as simple as: snap install lxd --channel=latest/stable

Then on run lxd init on the first server, answer yes to the clustering question, make sure the hostname is correct and that the address used is that on the mesh subnet, then create the new cluster setting an initial password and skipping over all the storage and network questions, it’s easier to configure those by hand later on.

After that, run lxd init on the remaining two servers, this time pointing them to the first server to join the existing cluster.

With that done, you have a LXD cluster:

root@langara:~# lxc cluster list
+----------+-------------------------------------+----------+--------+-------------------+--------------+----------------+
|   NAME   |                 URL                 | DATABASE | STATE  |      MESSAGE      | ARCHITECTURE | FAILURE DOMAIN |
+----------+-------------------------------------+----------+--------+-------------------+--------------+----------------+
| server-1 | https://[2602:XXXX:Y:ZZZ::100]:8443 | YES      | ONLINE | fully operational | x86_64       | default        |
+----------+-------------------------------------+----------+--------+-------------------+--------------+----------------+
| server-2 | https://[2602:XXXX:Y:ZZZ::101]:8443 | YES      | ONLINE | fully operational | x86_64       | default        |
+----------+-------------------------------------+----------+--------+-------------------+--------------+----------------+
| server-3 | https://[2602:XXXX:Y:ZZZ::102]:8443 | YES      | ONLINE | fully operational | x86_64       | default        |
+----------+-------------------------------------+----------+--------+-------------------+--------------+----------------+

Now that cluster needs to be configured to access OVN and to use Ceph for storage.

On the OVN side, all that’s needed is: lxc config set network.ovn.northbound_connection tcp:<server1>:6641,tcp:<server2>:6641,tcp:<server3>:6641

As for Ceph creating a Ceph RBD storage pool can be done with:

lxc storage create ssd ceph source=lxd-ssd --target server-1
lxc storage create ssd ceph source=lxd-ssd --target server-2
lxc storage create ssd ceph source=lxd-ssd --target server-3
lxc storage create ssd ceph

And for Ceph FS:

lxc storage create shared cephfs source=lxd-cephfs --target server-1
lxc storage create shared cephfs source=lxd-cephfs --target server-2
lxc storage create shared cephfs source=lxd-cephfs --target server-3
lxc storage create shared cephfs

In my case, I’ve also setup a lxd-hdd pool, resulting in a final setup of:

root@langara:~# lxc storage list
+--------+-------------+--------+---------+---------+
|  NAME  | DESCRIPTION | DRIVER |  STATE  | USED BY |
+--------+-------------+--------+---------+---------+
| hdd    |             | ceph   | CREATED | 1       |
+--------+-------------+--------+---------+---------+
| shared |             | cephfs | CREATED | 0       |
+--------+-------------+--------+---------+---------+
| ssd    |             | ceph   | CREATED | 16      |
+--------+-------------+--------+---------+---------+

Up next

The next post is likely to be quite network heavy, going into why I’m using dynamic routing and how I’ve got it all setup. This is the missing piece of the puzzle in what I’ve shown so far as without it, you’d need an external router with a bunch of static routes to send traffic to the OVN networks.

Posted in Canonical voices, LXD, Planet Ubuntu | Tagged | 7 Comments

Inexpensive highly available LXD cluster: Redundancy

In the previous post I went over the reasons for switching to my own hardware and what hardware I ended up selecting for the job.

Now it’s time to look at how I intend to achieve the high availability goals of this setup. Effectively limiting the number of single point of failure as much as possible.

Hardware redundancy

On the hardware front, every server has:

  • Two power supplies
  • Hot swappable storage
  • 6 network ports served by 3 separate cards
  • BMC (IPMI/redfish) for remote monitoring and control

The switch is the only real single point of failure on the hardware side of things. But it also has two power supplies and hot swappable fans. If this ever becomes a problem, I can also source a second unit and use data and power stacking along with MLAG to get rid of this single point of failure.

I mentioned that each server has four 10Gbit ports yet my switch is Gigabit. This is fine as I’ll be using a mesh type configuration for the high-throughput part of the setup. Effectively connecting each server to the other two with a dual 10Gbit bond each. Then each server will get a dual Gigabit bond to the switch for external connectivity.

Software redundancy

The software side is where things get really interesting, there are three main aspects that need to be addressed:

  • Storage
  • Networking
  • Compute

Storage

For storage, the plan is to rely on Ceph, each server will run a total of 4 OSDs, one per physical drive with the SATA SSD acting as boot drive too with the OSD being a large partition on it instead of the full disk.

Each server will also act as MON, MGR and MDS providing a fully redundant Ceph cluster on 3 machines capable of providing both block and filesystem storage through RBD and FS.

Two maps will be setup, one for HDD storage and one for SSD storage.
Storage affinity will also be configured such that the NVME drives will be used for the primary replica in the SSD map with the SATA drives holding secondary/tertiary replicas instead.

This makes the storage layer quite reliable. A full server can go down with only minimal impact. Should a server being offline be caused by hardware failure, the on-site staff can very easily relocate the drives from the failed server to the other two servers allowing Ceph to recover the majority of its OSDs until the defective server can be repaired.

Networking

Networking is where things get quite complex when you want something really highly available. I’ll be getting a Gigabit internet drop from the co-location facility on top of which a /27 IPv4 and a /48 IPv6 subnet will be routed.

Internally, I’ll be running many small networks grouping services together. None of those networks will have much in the way of allowed ingress/egress traffic and the majority of them will be IPv6 only.

The majority of egress will be done through a proxy server and IPv4 access will be handled through a DNS64/NAT64 setup.
Ingress when needed will be done by directly routing an additional IPv4 or IPv6 address to the instance running the external service.

At the core of all this will be OVN which will run on all 3 machines with its database clustered. Similar to Ceph for storage, this allows machines to go down with no impact on the virtual networks.

Where things get tricky is on providing a highly available uplink network for OVN. OVN draws addresses from that uplink network for its virtual routers and routes egress traffic through the default gateway on that network.

One option would be for a static setup, have the switch act as the gateway on the uplink network, feed that to OVN over a VLAN and then add manual static routes for every public subnet or public address which needs routing to a virtual network. That’s easy to setup, but I don’t like the need to constantly update static routing information in my switch.

Another option is to use LXD’s l2proxy mode for OVN, this effectively makes OVN respond to ARP/NDP for any address it’s responsible for but then requires the entire IPv4 and IPv6 subnet to be directly routed to the one uplink subnet. This can get very noisy and just doesn’t scale well with large subnets.

The more complicated but more flexible option is to use dynamic routing.
Dynamic routing involves routers talking to each other, advertising and receiving routes. That’s the core of how the internet works but can also be used for internal networking.

My setup effectively looks like this:

  • Three containers running FRR each connected to both the direct link with the internet provider and to the OVN uplink network.
  • Each one of those will maintain BGP sessions with the internet provider’s routers AS WELL as with the internal hosts running OVN.
  • VRRP is used to provide a single highly available gateway address on the OVN uplink network.
  • I wrote lxd-bgp as a small BGP daemon that integrates with the LXD API to extract all the OVN subnets and instance addresses which need to be publicly available and announces those routes to the three routers.

This may feel overly complex and it quite possibly is, but that gives me three routers, one on each server and only one of which need to be running at any one time. It also gives me the ability to balance routing traffic both ingress or egress by tweaking the BGP or VRRP priorities.

The nice side effect of this setup is that I’m also able to use anycast for critical services both internally and externally. Effectively running three identical copies of the service, one per server, all with the exact same address. The routers will be aware of all three and will pick one at the destination. If that instance or server goes down, the route disappears and the traffic goes to one of the other two!

Compute

On the compute side, I’m obviously going to be using LXD with the majority of services running in containers and with a few more running in virtual machines.

Stateless services that I want to always be running no matter what happens will be using anycast as shown above. This also applies to critical internal services as is the case above with my internal DNS resolvers (unbound).

Other services may still run two or more instances and be placed behind a load balancing proxy (HAProxy) to spread the load as needed and handle failures.

Lastly even services that will only be run by a single instance will still benefit from the highly available environment. All their data will be stored on Ceph, meaning that in the event of a server maintenance or failure, it’s a simple matter of running lxc move to relocate them to any of the others and bring them back online. When planned ahead of time, this is service downtime of less than 5s or so.

Up next

In the next post, I’ll be going into more details on the host setup, setting up Ubuntu 20.04 LTS, Ceph, OVN and LXD for such a cluster.

Posted in Canonical voices, LXD, Planet Ubuntu | Tagged | 2 Comments

Inexpensive highly available LXD cluster: Introduction

It’s been a couple of years since I last posted here, instead I’ve mostly been focusing on LXD specific content which I’ve been publishing on our discussion forum rather than on my personal blog.

But this is going to be a bit of a journey and is about my personal infrastructure so this feels like a better home for it!

What is this all about?

For years now, I’ve been using dedicated servers from the likes of Hetzner or OVH to host my main online services, things ranging from DNS servers, to this blog, to websites for friends and family, to more critical things like the linuxcontainers.org website, forum and main image publishing logic.

All in all, that’s around 30 LXD instances with a mix of containers and virtual machines that need to run properly 24/7 and have good internet access.

I’m a sysadmin at heart, I know how to design and run complex infrastructures, how to automate things, monitor things and fix them when things go bad. But having everything rely on a single beefy machine rented month to month from an online provider definitely has its limitations and this series is all about fixing that!

The current state of things

As mentioned, I have about 30 LXD instances that need to be online 24/7.
This is currently done using a single server at OVH in Montreal with:

  • CPU: Intel Xeon E3-1270v6 (4c/8t)
  • RAM: 32GB
  • HDD: 2x500GB NVME + 2x2TB CMR HDD
  • Network: 1Gb/s (with occasional limit down to 500Mb/s)
  • OS: Ubuntu 18.04 LTS with HWE kernel and latest LXD
  • Cost: 160.95 CAD/month (with taxes)

I consider this a pretty good value for the cost, it comes with BMC access for remote maintenance, some amount of monitoring and on-site staff to deal with hardware failures.

But everything goes offline if:

  • Any hardware fail (except for storage which is redundant)
  • System needs rebooting
  • LXD or kernel crashes

LXD has a very solid clustering feature now which requires a minimum of 3 servers and will provide a highly available database and API layer. This can be combined with distributed storage through Ceph and distributed networking through OVN.

But to benefit from this, you need 3 servers and you need fast networking between those 3 servers. Looking around for options in the sub-500CAD price range didn’t turn up anything particularly suitable so I started considering alternatives.

Going with my own hardware

If you can’t rent anything at a reasonable price, the alternative is to own it.
Buying 3 brand new servers and associated storage and network equipment was out of the question. This would quickly balloon into the tens of thousands of dollars for something I’d like to buy new and just isn’t worth it given the amount of power I actually need out of this cluster.

So as many in that kind of situation, I went on eBay 🙂
My criteria list ended up being:

  • SuperMicro servers
    This is simply because I already own a few and I operate a rack full of them for NorthSec. I know their product lines, I know their firmware and BMCs and I know how to get replacement parts and fix them.
  • Everything needs to be dual-PSU
  • Servers must be on the SuperMicro X10 platform or more recent.
    This effectively means I get Xeon E-series v3 or v4 and get basic RedFish support in the firmware for remote management.
  • 64GB of RAM or more
  • At least two 10Gb ports
  • Cost 1000CAD or less a piece

In the end, I ended up shopping directly with UnixSurplus through their eBay store. I’ve used them before and they pretty much beat everyone else on pricing for used SuperMicro kit.

What I settled on is three:

The motherboard supports Xeon E5v4 chips, so the CPUs can be swapped for more recent and much more powerful chips should the need arise and good candidates show up on eBay. Same story with the memory, this is just 4 sticks of 16GB leaving 20 free slots for expansion.

For each of them, I’ve then added some storage and networking:

  • 1x 500GB Samsung 970 Pro NVME (avoid the 980 Pro, they’re not as good)
  • 1x 2TB Samsung 860 Pro SATA SSD
  • 1x 4TB Seagate Ironwolf Pro CMR HDD
  • 1x 6TB Seagate Ironwolf Pro CMR HDD
  • 1x U.2 to PCIe adapter (no U.2 on this motherboard)
  • 1x 2.5″ to 3.5″ adapter (so the SSD can fit in a tray)
  • 1x Intel I350-T2
  • Cost: 950CAD per server

For those, I went with new off Amazon/Newegg and picked what felt like the best deal at the time. I went with high quality consumer/NAS parts rather than DC grade but using parts I’ve been running 24/7 elsewhere before and that in my experience provide adequate performance.

For the network side of things, I wanted a 24 ports gigabit switch with dual power supply, hot replaceable fans and support for 10Gbit uplink. NorthSec has a whole bunch of C3750X which have worked well for us and are at the end of their supported life making them very cheap on eBay, so I got a C3750X with a 10Gb module for around 450CAD.

Add everything up and the total hardware cost ends up at a bit over 6000CAD, make it 6500CAD with extra cables and random fees.
My goal is to keep that hardware running for around 5 years so a monthly cost of just over 100CAD.

Where to put all this

Before I actually went ahead and ordered all that stuff though, I had to figure out a place for it and sort out a deal for power and internet.

Getting good co-location deals for less than 5U of space is pretty tricky. Most datacenter won’t even talk to you if you want less than a half rack or a rack.

Luckily for me, I found a Hive Datacenter that’s less than a 30min drive from here and which has nice public pricing on a per-U basis. After some chit chat, I got a contract for 4U of space with enough power and bandwidth for my needs. They also have a separate network for your OOB/IPMI/BMC equipment which you can connect to over VPN!

This sorts out the where to put it all, so I placed my eBay order and waited for the hardware to arrive!

Up next

So that post pretty much cover the needs and current situation and the hardware and datacenter I’ll be using for the new setup.

What’s not described is how I actually intend to use all this hardware to get me the highly available setup that I’m looking for!

The next post goes over all the redundancy in this setup, looking at storage, network and control plane and how it can handle various failure cases.

Posted in Canonical voices, LXD, Planet Ubuntu | Tagged | Leave a comment

Custom user mappings in LXD containers

LXD logo

Introduction

As you may know, LXD uses unprivileged containers by default.
The difference between an unprivileged container and a privileged one is whether the root user in the container is the “real” root user (uid 0 at the kernel level).

The way unprivileged containers are created is by taking a set of normal UIDs and GIDs from the host, usually at least 65536 of each (to be POSIX compliant) and mapping those into the container.

The most common example and what most LXD users will end up with by default is a map of 65536 UIDs and GIDs, with a host base id of 100000. This means that root in the container (uid 0) will be mapped to the host uid 100000 and uid 65535 in the container will be mapped to uid 165535 on the host. UID/GID 65536 and higher in the container aren’t mapped and will return an error if you attempt to use them.

From a security point of view, that means that anything which is not owned by the users and groups mapped into the container will be inaccessible. Any such resource will show up as being owned by uid/gid “-1” (rendered as 65534 or nobody/nogroup in userspace). It also means that should there be a way to escape the container, even root in the container would find itself with just as much privileges on the host as a nobody user.

LXD does offer a number of options related to unprivileged configuration:

  • Increasing the size of the default uid/gid map
  • Setting up per-container maps
  • Punching holes into the map to expose host users and groups

Increasing the size of the default map

As mentioned above, in most cases, LXD will have a default map that’s made of 65536 uids/gids.

In most cases you won’t have to change that. There are however a few cases where you may have to:

  • You need access to uid/gid higher than 65535.
    This is most common when using network authentication inside of your containers.
  • You want to use per-container maps.
    In which case you’ll need 65536 available uid/gid per container.
  • You want to punch some holes in your container’s map and need access to host uids/gids.

The default map is usually controlled by the “shadow” set of utilities and files. On systems where that’s the case, the “/etc/subuid” and “/etc/subgid” files are used to configure those maps.

On systems that do not have a recent enough version of the “shadow” package. LXD will assume that it doesn’t have to share uid/gid ranges with anything else and will therefore assume control of a billion uids and gids, starting at the host uid/gid 100000.

But the common case, is a system with a recent version of shadow.
An example of what the configuration may look like is:

stgraber@castiana:~$ cat /etc/subuid
lxd:100000:65536
root:100000:65536

stgraber@castiana:~$ cat /etc/subgid
lxd:100000:65536
root:100000:65536

The maps for “lxd” and “root” should always be kept in sync. LXD itself is restricted by the “root” allocation. The “lxd” entry is used to track what needs to be removed if LXD is uninstalled.

Now if you want to increase the size of the map available to LXD. Simply edit both of the files and bump the last value from 65536 to whatever size you need. I tend to bump it to a billion just so I don’t ever have to think about it again:

stgraber@castiana:~$ cat /etc/subuid
lxd:100000:1000000000
root:100000:1000000000

stgraber@castiana:~$ cat /etc/subgid
lxd:100000:1000000000
root:100000:100000000

After altering those files, you need to restart LXD to have it detect the new map:

root@vorash:~# systemctl restart lxd
root@vorash:~# cat /var/log/lxd/lxd.log
lvl=info msg="LXD 2.14 is starting in normal mode" path=/var/lib/lxd t=2017-06-14T21:21:13+0000
lvl=warn msg="CGroup memory swap accounting is disabled, swap limits will be ignored." t=2017-06-14T21:21:13+0000
lvl=info msg="Kernel uid/gid map:" t=2017-06-14T21:21:13+0000
lvl=info msg=" - u 0 0 4294967295" t=2017-06-14T21:21:13+0000
lvl=info msg=" - g 0 0 4294967295" t=2017-06-14T21:21:13+0000
lvl=info msg="Configured LXD uid/gid map:" t=2017-06-14T21:21:13+0000
lvl=info msg=" - u 0 1000000 1000000000" t=2017-06-14T21:21:13+0000
lvl=info msg=" - g 0 1000000 1000000000" t=2017-06-14T21:21:13+0000
lvl=info msg="Connecting to a remote simplestreams server" t=2017-06-14T21:21:13+0000
lvl=info msg="Expiring log files" t=2017-06-14T21:21:13+0000
lvl=info msg="Done expiring log files" t=2017-06-14T21:21:13+0000
lvl=info msg="Starting /dev/lxd handler" t=2017-06-14T21:21:13+0000
lvl=info msg="LXD is socket activated" t=2017-06-14T21:21:13+0000
lvl=info msg="REST API daemon:" t=2017-06-14T21:21:13+0000
lvl=info msg=" - binding Unix socket" socket=/var/lib/lxd/unix.socket t=2017-06-14T21:21:13+0000
lvl=info msg=" - binding TCP socket" socket=[::]:8443 t=2017-06-14T21:21:13+0000
lvl=info msg="Pruning expired images" t=2017-06-14T21:21:13+0000
lvl=info msg="Updating images" t=2017-06-14T21:21:13+0000
lvl=info msg="Done pruning expired images" t=2017-06-14T21:21:13+0000
lvl=info msg="Done updating images" t=2017-06-14T21:21:13+0000
root@vorash:~#

As you can see, the configured map is logged at LXD startup and can be used to confirm that the reconfiguration worked as expected.

You’ll then need to restart your containers to have them start using your newly expanded map.

Per container maps

Provided that you have a sufficient amount of uid/gid allocated to LXD, you can configure your containers to use their own, non-overlapping allocation of uids and gids.

This can be useful for two reasons:

  1. You are running software which alters kernel resource ulimits.
    Those user-specific limits are tied to a kernel uid and will cross container boundaries leading to hard to debug issues where one container can perform an action but all others are then unable to do the same.
  2. You want to know that should there be a way for someone in one of your containers to somehow get access to the host that they still won’t be able to access or interact with any of the other containers.

The main downsides to using this feature are:

  • It’s somewhat wasteful with using 65536 uids and gids per container.
    That being said, you’d still be able to run over 60000 isolated containers before running out of system uids and gids.
  • It’s effectively impossible to share storage between two isolated containers as everything written by one will be seen as -1 by the other. There is ongoing work around virtual filesystems in the kernel that will eventually let us get rid of that limitation.

To have a container use its own distinct map, simply run:

stgraber@castiana:~$ lxc config set test security.idmap.isolated true
stgraber@castiana:~$ lxc restart test
stgraber@castiana:~$ lxc config get test volatile.last_state.idmap
[{"Isuid":true,"Isgid":false,"Hostid":165536,"Nsid":0,"Maprange":65536},{"Isuid":false,"Isgid":true,"Hostid":165536,"Nsid":0,"Maprange":65536}]

The restart step is needed to have LXD remap the entire filesystem of the container to its new map.
Note that this step will take a varying amount of time depending on the number of files in the container and the speed of your storage.

As can be seen above, after restart, the container is shown to have its own map of 65536 uids/gids.

If you want LXD to allocate more than the default 65536 uids/gids to an isolated container, you can bump the size of the allocation with:

stgraber@castiana:~$ lxc config set test security.idmap.size 200000
stgraber@castiana:~$ lxc restart test
stgraber@castiana:~$ lxc config get test volatile.last_state.idmap
[{"Isuid":true,"Isgid":false,"Hostid":165536,"Nsid":0,"Maprange":200000},{"Isuid":false,"Isgid":true,"Hostid":165536,"Nsid":0,"Maprange":200000}]

If you’re trying to allocate more uids/gids than are left in LXD’s allocation, LXD will let you know:

stgraber@castiana:~$ lxc config set test security.idmap.size 2000000000
error: Not enough uid/gid available for the container.

Direct user/group mapping

The fact that all uids/gids in an unprivileged container are mapped to a normally unused range on the host means that sharing of data between host and container is effectively impossible.

Now, what if you want to share your user’s home directory with a container?

The obvious answer to that is to define a new “disk” entry in LXD which passes your home directory to the container:

stgraber@castiana:~$ lxc config device add test home disk source=/home/stgraber path=/home/ubuntu
Device home added to test

So that was pretty easy, but did it work?

stgraber@castiana:~$ lxc exec test -- bash
root@test:~# ls -lh /home/
total 529K
drwx--x--x 45 nobody nogroup 84 Jun 14 20:06 ubuntu

No. The mount is clearly there, but it’s completely inaccessible to the container.
To fix that, we need to take a few extra steps:

  • Allow LXD’s use of our user uid and gid
  • Restart LXD to have it load the new map
  • Set a custom map for our container
  • Restart the container to have the new map apply
stgraber@castiana:~$ printf "lxd:$(id -u):1\nroot:$(id -u):1\n" | sudo tee -a /etc/subuid
lxd:201105:1
root:201105:1

stgraber@castiana:~$ printf "lxd:$(id -g):1\nroot:$(id -g):1\n" | sudo tee -a /etc/subgid
lxd:200512:1
root:200512:1

stgraber@castiana:~$ sudo systemctl restart lxd

stgraber@castiana:~$ printf "uid $(id -u) 1000\ngid $(id -g) 1000" | lxc config set test raw.idmap -

stgraber@castiana:~$ lxc restart test

At which point, things should be working in the container:

stgraber@castiana:~$ lxc exec test -- su ubuntu -l
ubuntu@test:~$ ls -lh
total 119K
drwxr-xr-x 5  ubuntu ubuntu 8 Feb 18 2016 data
drwxr-x--- 4  ubuntu ubuntu 6 Jun 13 17:05 Desktop
drwxr-xr-x 3  ubuntu ubuntu 28 Jun 13 20:09 Downloads
drwx------ 84 ubuntu ubuntu 84 Sep 14 2016 Maildir
drwxr-xr-x 4  ubuntu ubuntu 4 May 20 15:38 snap
ubuntu@test:~$ 

Conclusion

User namespaces, the kernel feature that makes those uid/gid mappings possible is a very powerful tool which finally made containers on Linux safe by design. It is however not the easiest thing to wrap your head around and all of that uid/gid map math can quickly become a major issue.

In LXD we’ve tried to expose just enough of those underlying features to be useful to our users while doing the actual mapping math internally. This makes things like the direct user/group mapping above significantly easier than it otherwise would be.

Going forward, we’re very interested in some of the work around uid/gid remapping at the filesystem level, this would let us decouple the on-disk user/group map from that used for processes, making it possible to share data between differently mapped containers and alter the various maps without needing to also remap the entire filesystem.

Extra information

The main LXD website is at: https://linuxcontainers.org/lxd
Development happens on Github at: https://github.com/lxc/lxd
Discussion forun: https://discuss.linuxcontainers.org
Mailing-list support happens on: https://lists.linuxcontainers.org
IRC support happens in: #lxcontainers on irc.freenode.net
Try LXD online: https://linuxcontainers.org/lxd/try-it

Posted in Canonical voices, LXC, LXD, Planet Ubuntu | Tagged | 10 Comments